The 62 Degree Egg

That’s Celsius, not Fahrenheit. Popping up everywhere in chic restaurants. What is the fuss all about? Armed with my Sansaire and a dozen farm fresh eggs, I decided to find out for myself.

Sometimes called a sous vide egg, the real correlation is the immersion cooking. Eggs cooked with an immersion circulator don’t need to be vacuum sealed as in a sous vide preparation (sous vide translates loosely to vacuum sealed). Eggs are already sealed perfectly in their own shell. This is a method for cooking eggs at a consistently precise temperature.

I decided to start experimenting with my eggs and varying water temperatures. Does cooking time matter? Yes, it factors in with eggs and immersion cooking. You cannot leave the eggs in the water for hours without changes in the consistency. Conversely, you can cook them to the temperature you desire and refrigerate them for a day or two until you are ready to serve. For this round of testing, I let my eggs cook in their hot bath for one hour.

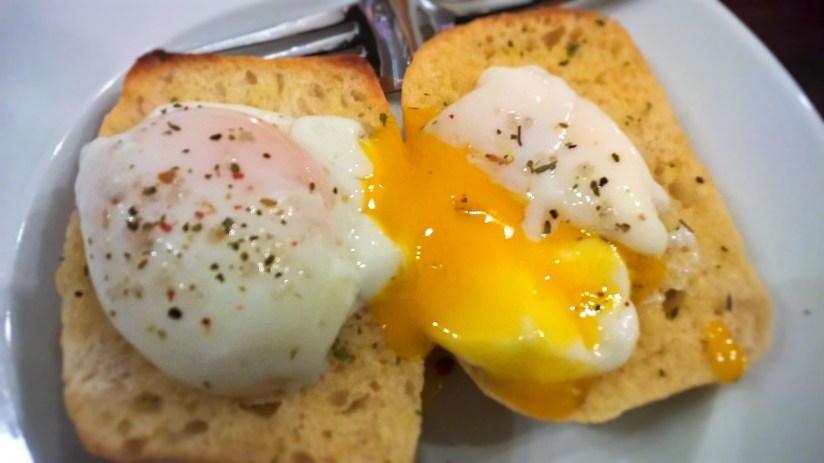
Experiment #1 – 62 deg. Celsius: Poached Eggs over Garlic Ciabatta

There is nothing better than a smooth, silky egg yolk opened over practically any food. Tonight it is garlic ciabatta toast – I cheated and used the New York kind I had in my freezer.

2 farm fresh eggs, room temperature
Garlic ciabatta toast, or any toast you prefer
Freshly ground salt and pepper

Set your Sansaire (or other immersion circulator) to 63 deg. Celsius, 143.6 deg. Fahrenheit; and take the eggs out to reach room temperature. It will take a bit to reach this water temperature depending on how much water you are using. At temp, slowly lower the eggs into the water using a ladle. Remember, they are fragile hitting water of this temperature. Set a timer for one hour on the eggs.

With about 10 minutes left on the timer, prep the toast. Keep it warm in the oven until ready to plate.

After an hour, remove the eggs from their hot bath. Crack the largest end of the egg on the counter, and start to gently peel it. Once you have the large end peeled, let your egg slowly slide out onto a large spoon or ladle. You will notice that the runny part of the white is not completely set; this can be discarded. The thicker part of the white will be just set.

These little guys are surprisingly resilient; but do be careful with them. The first one I peeled rolled right off the piece of toast and I was afraid it was going to break the yolk. I chased it around the bowl with my ladle and got it back onto the toast, unbroken. Sprinkle with freshly ground salt and pepper to taste; I used Savory Spices’ Cantanzaro Herbs Seasoning Salt.

wp_20160203_21_58_33_pro2028229

The consistency of the egg yolk? Creamy, dreamy, and utterly delicious. The bright orange, silky yolk was the perfect complement to the toast. Distinctly different than a standard poached egg; this method is definitely now my preferred method for poaching. Enjoy!

wp_20160203_21_59_08_pro2028229-x2

Sous Vide Steak Sunday

WOW! I can’t believe it’s been one year to the day since I’ve blogged here. Life. Tonight I decided I’d like a traditional steakhouse meal of Ribeye, mashed potatoes, and green beans (unfortunately I am out of asparagus). I picked up a really nice ribeye the other day, from Carolina Fish Market, who have recently started stocking Meats by Linz. The best way to cook a steak? Sous vide, of course. It gives you the perfect cook – every time – from edge to edge. Also, you can just drop it in it’s little bath and leave it alone for a while. You can learn more about sous vide cooking on the Sansaire site.

Let’s get started.

I like my steak rare, so I set my Sansaire to warm the water bath to 122 deg. F. (Depending on how you like your steak done, you can refer to the Sansaire guide for cooking steak.) While waiting for the water to heat up, I seasoned my steak. I’m a big fan of lots of freshly ground black pepper, as it makes a very nice crust when you sear it. I used ground black pepper, pink Himalayan salt, and a shot of Hudson Bay Beef Spice from Savory Spices – my favorite spice store.

wp_20160117_19_06_28_pro2028229-x2

After seasoning, it needs to go into a waterproof bag with the air removed. I used my Food Saver machine, but you can also use a Zip-lock bag if you don’t have a sealer. Before sealing, I added about two tablespoons of garlic-infused olive oil. Sealed it up and it was ready for the bath.

wp_20160117_19_12_53_pro2028229-x2

I dropped it into the 122 deg. F water and let it go for 90 minutes. Because the Sansaire keeps the water at the perfect temperature, you can leave it there for up to four hours without worrying about overcooking.

wp_20160117_19_34_22_pro2028229-xl

In preparation for it leaving the bath, heat a skillet on high. You can also create your sear on the grill, a cast iron skillet, or by using a searing torch. Your standard kitchen torch for creme brulee will not cut it here – you need one much stronger. I have yet to order one, so for me tonight it’s an All-Clad Copper Core pan.

I heated my pan on high, and when it was hot, added a tablespoon of butter. Keep that butter moving so it doesn’t brown. When the bubbles start to settle down, add the steak. I continuously keep mine moving in a circle around the pan, so it doesn’t burn and keeps moving the butter/juices around. After about a minute, check the sear and flip the steak if it suits you. Same thing on the other side, and then plate it. There is no need to rest a steak when cooked via sous vide.

wp_20160117_21_25_44_pro2028229-xl

Now I know you are all thinking, ‘Let’s see the inside! Show me that edge to edge perfectly cooked steak.’ Here you go, plated with mashed Yukon Gold potatoes and French green beans; freshly ground black pepper and a sprinkle of sea salt flakes. Happy sous viding! 🙂

wp_20160117_21_30_32_pro2028229-xl


Sous Vide Lobster Tails

I have been wanting to try sous vide cooking for some time, and on the recommendation of my colleagues bought myself a Sansaire for Christmas. Being one of those people who has a lot of kitchen ‘gadgets’, and very susceptible to advertising of new ones, I wanted a sous vide unit that would be easy to store. The Sansaire is just perfect. It’s a tall, black tower that you immerse partially into water for sous vide cooking. It stores easily, and doesn’t take up the room that something with a water receptacle would. For those that are curious, you can cool down bottles of wine very quickly with this baby as well. 🙂

Clean Catch had a huge selection of seafood in for the holidays, and I picked up two 10 ounce lobster tails with the rest of my order. I did some research on sous vide and cooking lobster, and it went all the way from 17 minutes to 41 minutes at 140 deg. F. Most of the articles were close to the 40 minute mark. Armed with my new toy, off I went into the kitchen.

My lobster tails came out very tender, with the entire tail cooked the same. Cooking in the water bath preserves the true taste of the lobster, which other methods don’t always do. I would cook these over and over again, and I can’t wait to try a variety of things with the Sansaire.

The Tails

2 10 oz lobster tails
4 Tbsp high quality butter; I used Plugra European Style, Kerrygold Irish works as well
2 tsp of your favorite seafood seasoning; I used Savory Spice Shop’s Cherry Creek Seafood Seasoning
Quartered lemons, for serving

In a pot big enough to hold water to be between the minimum and maximum lines on the Sansaire, fill it appropriately, keeping in mind that you will be adding food to it. Immerse the Sansaire, and set it to 140 deg. F.

Remove the meat from the lobster tails. I’ve found the easiest way to do this is to cut down the middle of the front and the back of the tail with seafood shears, and then carefully work the meat away from the shell. You can also blanch them for a minute to make the meat easier to remove.

WP_20141224_20_14_10_Pro (3)

Put the tail meat, with 1 Tbsp of butter and 1 tsp of seafood seasoning, into a Food Saver bag. If you don’t have Food Saver bags, you can use a normal plastic zip and lock bag. Remove all the air from the bag and seal it using the machine. If using a normal plastic bag, lower the bag slowly into the water. The water will displace the air in the bag. When you are near the top, zip it closed.

WP_20141224_20_32_16_Pro (3)

When your bags are sealed, confirm the water temperature is at 140 deg. F., and drop them into their bath. Leave them alone for 41 minutes.

WP_20141224_21_02_08_Pro (3)

After the time has passed, remove them from the water and from their bags. Serve with lemon quarters and two Tbsp. drawn butter. Enjoy!!

WP_20141224_21_26_22_Pro (3)