Paella Valenciana

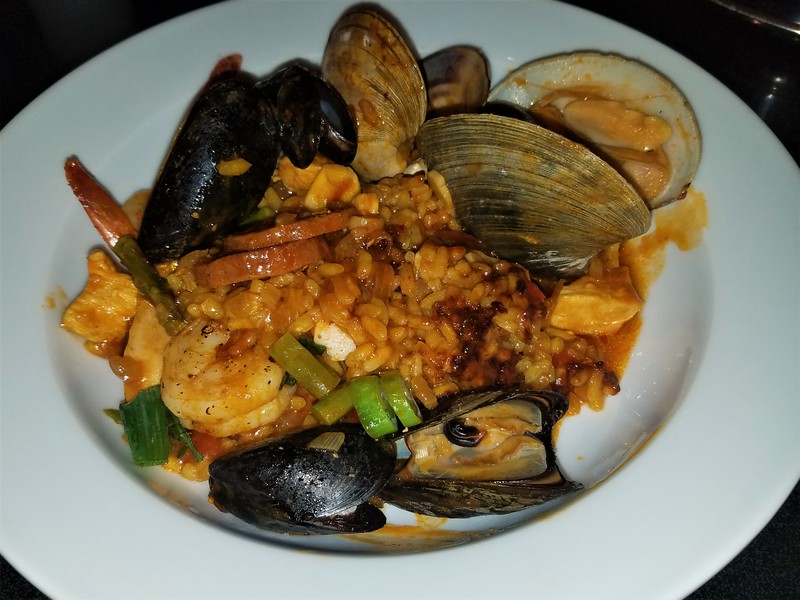
I enjoyed my first Paella Valenciana at Miro Spanish Grille in Charlotte a few months after they first opened. Thinking back on the experience, I was definitely new to traditional Spanish cuisine. I remember wondering why the rice was crusted on the bottom of my paella, but luckily I did not say anything. I now know the delicious crust is known as the socarrat, and is a sign of well-cooked paella. It is considered a delicacy.

Paella originated in Valencia, a fertile rice-growing region along the eastern coast of Spain. The word paella stems from the Latin word patella, which means ‘pan’, and refers to the type of pan used to cook the rice. The paellera is a wide, shallow pan with handles on opposite sides. The flat, round shape of the paella pan allows the rice to cook evenly without trapping too much moisture inside the grains. If you don’t have a paella pan, you can use a large heavy skillet, at least 12 inches in diameter. I used a copper core All-Clad pan; solid, heavy bottom that holds the heat extremely well.

There are endless variations on paella using a variety of poultry, seafood, meats, and vegetables; use what you enjoy in it. Today I am using shrimp, clams, mussels, chorizo, chicken, and asparagus. All of my seafood came from Catch On Seafood – a neat little store in Plaza Midwood. In all paellas there are three basic ingredients: stock, olive oil, and the real star of the dish – the rice.

rc-03

Bomba rice is considered the best strain of Spanish short-grain rice for paella. Bomba is unique for its ability to absorb three times its volume in liquid without turning mushy. The more flavorful the liquid, the more flavor-packed the cooked grain. The difference in the absorption rate is significant enough that if you are using Bomba rice, allow 3 cups of liquid for every cup of rice. Italian Arborio is often suggested as a substitution, some believe it is too creamy. This will be my test today, as I was unable to find Bomba rice after visiting three stores! Arborio it is for my first go at paella.

NOTE: Bomba rice is available at La Tienda and Amazon for mail order.

20161224_180250upload-l

For this dish, it’s helpful to have everything ready before you start cooking. Keep the seafood and the meat in the refrigerator until just ready to cook. Do all your chopping, and get your stocks and rice measured out. It’s going to look like a lot of ingredients, but it goes fast and you will not be disappointed. Mine came out excellent! I have some Bomba rice on order and will post a follow up in a couple of weeks.

20161224_183657upload-l

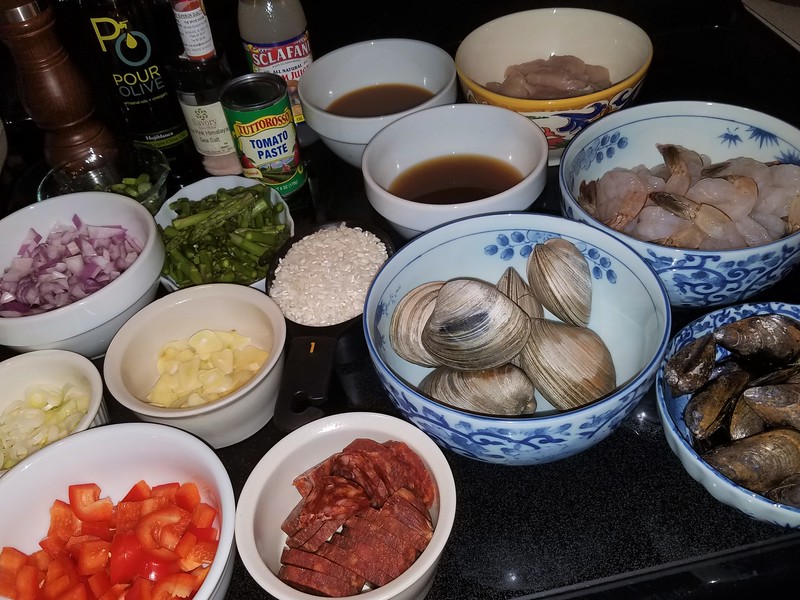
  • 1.5 cups Italian Arborio rice
  • 3 cups stock. A mix of stock is preferred, rather than just one type; today I used 1 cup each of clam juice, Classic Seafood Stock, and Roasted Vegetable Demi-Glace.
  • 1 cup dried Spanish chorizo (sliced into ¼ inch rounds)
  • 1/2 lb boneless skinless chicken breast, large dice
  • 1/2 lb peeled and deveined shrimp
  • 1 dozen mussels
  • 6 count middleneck clams
  • Spanish Extra Virgin Olive Oil, I used Hojiblanca from Pour Olive
  • ½ cup Red pepper, small dice
  • 1 small Spanish red onion, small dice
  • ¼ cup tomato paste
  • 3 cloves of garlic, very thinly sliced (you can also dice, but I like the paper thin slices)
  • 20 threads Spanish saffron. I used a generous pinch powdered Spanish saffron from The Spice House.
  • 1 bunch of scallions sliced thin, keeping the green tops and the white bottoms separate
  • 1 cup Asparagus, bite size cut
  • Salt and fresh ground black pepper

Let your paella pan heat for a bit on a large burner at medium-high. And add a few tablespoons of olive oil, and swirl to coat the pan. Make sure that the entire bottom of the pan is nicely coated with oil. Add the chorizo first, and let it brown on both sides. Add the red pepper, onion, scallion whites, and garlic; sauté on medium heat for five minutes.

20161224_185124upload-l

Move the vegetables to the side of the pan, and add the tomato paste to the other size. Caramelize the paste for a couple minutes, and then mix it into the vegetables. First round of seasoning – add salt, pepper, and the saffron to the mix and continue cooking for a few more minutes.

Add chicken and then toss with other ingredients; and sauté for two more minutes. Add the rice by sprinkling it over the top of everything.

Add the stock(s) and turn the heat to high. From this point on, DO NOT stir the paella. Stirring a paella makes it gummy. Twist and shake your pan around a bit so the rice starts to settle through to the bottom. Turn the heat to high and when the stock is boiling, add the clams. Turn back down to medium-high heat and continue to boil for another 8-10 minutes.

Watch the clams, when they open if they take on rice, gently empty the rice back out and move them to the side. Shift the pan around on the burner periodically to ensure even cooking on the bottom.

When the clams have opened, add the asparagus, and then scatter the mussels and shrimp on top of the paella. Turn the heat down to medium. You can shake the pan a bit again, but remember – no stirring!

20161224_191912upload-l

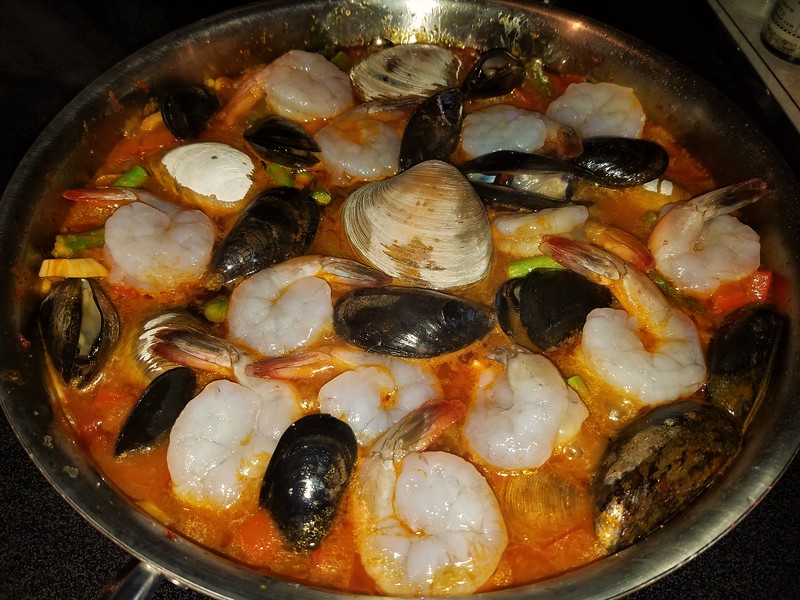
When the mussels are open and the shrimp is cooked, check the bottom of the paella for the socarrat (crust).  If the paella does not have a crust, simply turn up the heat and cook until it does. Once the crust is formed, garnish the paella with the scallion tops, freshly ground pepper, and a healthy drizzle of olive oil.

20161224_194202upload-l

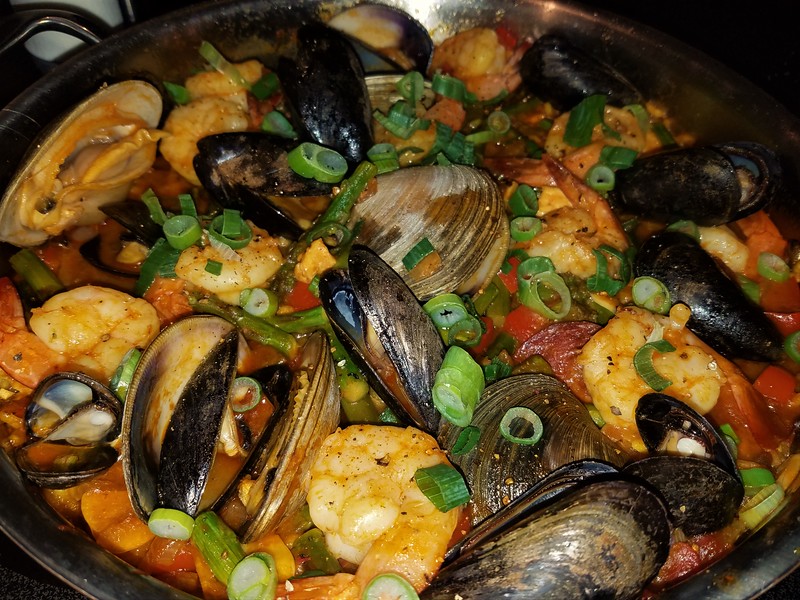
Let the paella sit for ten minutes, uncovered, before serving. And oh yeah – that crust? Dark brown, slightly crispy and delicious!! 🙂

20161224_194415upload-l

The Food You Feed Your Furry Family Members

I have owned Dobermans for the past 15 years, and just adopted a senior girl, Kota, from a Doberman rescue. My dogs have always been part of my family, just like the people. Through the years I’ve done extensive research on the best food for them and their respective life stages. I’ve monitored lots of discussion groups specific to Dobermans. I’ve talked with numerous vets about their recommendations on food. Lately I’ve started to also explore the whole food and holistic side of pet nutrition.

I picked up Kota today, and they gave me a huge bag of Hill’s Prescription Diet J/D for my senior girl. The rescue uses Hill’s J/D for all their senior dogs. They also feed Solid Gold, which is a pretty highly rated dog food. Hill’s Prescription…not so much. Here’s why.

I looked up the ingredient list for Hill’s Prescription J/D on their website:

Whole Grain Corn, Chicken By-Product Meal, Flaxseed, Soybean Mill Run, Brewers Rice, Soybean Meal, Pork Fat, Powdered Cellulose, Chicken Liver Flavor, Fish Oil, Lactic Acid, Potassium Chloride, L-Lysine, Calcium Carbonate, Iodized Salt, Choline Chloride, DL-Methionine, vitamins (Vitamin E Supplement, L-Ascorbyl-2-Polyphosphate (source of Vitamin C), Niacin Supplement, Thiamine Mononitrate, Vitamin A Supplement, Calcium Pantothenate, Vitamin B12 Supplement, Pyridoxine Hydrochloride, Riboflavin Supplement, Biotin, Folic Acid, Vitamin D3 Supplement), L-Threonine, minerals (Ferrous Sulfate, Zinc Oxide, Copper Sulfate, Manganous Oxide, Calcium Iodate, Sodium Selenite), Taurine, Glucosamine Hydrochloride, L-Tryptophan, L-Carnitine, Mixed Tocopherols for freshness, Chondroitin Sulfate, Natural Flavors, Beta-Carotene

Let’s take the first two ingredients, Whole Grain Corn and Chicken By-Product Meal. Whole Grain Corn is a cheap and controversial grain with little nutritional value for a dog, yet it’s the main ingredient in this food. Chicken By-Product Meal is a dry rendered product of slaughterhouse waste. It’s made from what’s left of a slaughtered chicken after all the prime cuts have been removed. In addition to organs (the nourishing part), this stuff can contain almost anything — feet, beaks, undeveloped eggs — anything except feathers.

The ingredients do not get better; many are low grade, low nutritional value, and fillers for the dog food. The glucosamine and chondroitin to help with joint mobility? Not from a natural source. This food is ‘enhanced’ with synthetic glucosamine hydrochloride and chondroitin sulfate.

Quite frankly, this food is crap. A lot of veterinarians push Hill’s Prescription Diet foods as great foods that are made for your dog’s specific condition. Luckily, my vet has never tried this with me, as I’ve filled him in on all the brands that we’ve tried that are much, much better for my family members than this. The more I read on this topic, the more it starts sounding like a doctor that is pushing meds because they are being paid by a specific pharmaceutical company.

For comparison, let’s take a look at the ingredient list for Orijen Senior on the Orijen website:

Deboned chicken, deboned turkey, yellowtail flounder, whole eggs, whole Atlantic mackerel, chicken liver, turkey liver, chicken heart, turkey heart, whole Atlantic herring, dehydrated chicken, dehydrated turkey, dehydrated mackerel, dehydrated chicken liver, dehydrated turkey liver, whole green peas, whole navy beans, red lentils, chicken necks, chicken kidney, pinto beans, chickpeas, green lentils, alfalfa, lentil fiber, natural chicken flavor, chicken cartilage, herring oil, ground chicken bone, chicken fat, turkey cartilage, dried kelp, freeze-dried chicken liver, freeze-dried turkey liver, whole pumpkin, whole butternut squash, kale, spinach, mustard greens, collard greens, turnip greens, whole carrots, apples, pears, pumpkin seeds, sunflower seeds, zinc proteinate, mixed tocopherols (preservative), chicory root, turmeric, sarsaparilla root, althea root, rosehips, juniper berries, dried lactobacillus acidophilus fermentation product, dried bifidobacterium animalis fermentation product, dried lactobacillus casei fermentation product.

Notice anything different? It’s REAL FOOD. Interesting fact – the protein content in Hill’s is 19.2%; in Orijen Senior, it’s 38%. The glucosamine and chondroitin in Orijen comes from the fresh poultry, meat, and fish; naturally occurring and no synthetic additives to this food.

Another telling fact is the amount of food recommended per day. Hill’s Prescription J/D recommended 4-1/3 cups per day for an 80 lb dog. Orijen recommends 2-3/4 cups for an 88 lb dog. Why the huge difference? Hill’s is full of fillers and other things that are not beneficial to the dog. Orijen contains real food and that’s it.

Are better dog foods more expensive? Of course. This comparison is like eating fast food at McDonalds versus eating a good meal at a great steakhouse. Which one would you rather eat?

Please, please do your research for your family members!  🙂  They deserve it.

Orijen Senior: https://www.orijen.ca/foods/dog-food/dry-dog-food/senior-dog/?lang=us
Hill’s Prescription Diet J/D: http://www.hillspet.com/en/us/products/pd-canine-jd-dry
Dog Food Advisor (DFA) – Saving Good Dogs from Bad Food: http://www.dogfoodadvisor.com/
Orijen Dog Foods on DFA: http://www.dogfoodadvisor.com/dog-food-reviews/orijen-dog-food-usa/
Hill’s Prescription Diet Dog Foods on DFA: http://www.dogfoodadvisor.com/?s=Hill%27s+Prescription+Diet

Chicken Enchilada Stew

Fall, how I love thee! The change of leaves; cool, brisk air; apples, cider, and pumpkins; and promise of Halloween in the air. The season for comfort food has begun. Although it’s not really cool in Charlotte yet, I was craving a stew. I was intrigued by a recipe posted in one of the essential oil Facebook groups I belong to, so I set out to create my own yumminess!

I’ve adjusted it to suit my personal taste, and it came out medium-spicy. If you prefer your stews mild, back off a little on the chili powder and the chilies. If you love it hot, try adding some Serrano chilies to the mix! It came out quite thick, which is exactly the way I like it. I recommend adding the vegetable broth to thin it just a bit, but not too much.

You can view the original recipe, which makes use of essential oils, on Robyn Mitchell’s Naturally Simple Solutions page. Robyn also has lots of great information on doTERRA essential oils, which I am just starting to learn about. Unfortunately, I didn’t have the specific oils on hand to try with this, but I will the next time. If you’re interested in learning more about essential oils with me, please let me know! 🙂

20161003_1856572028229-l

Chicken Enchilada Stew

2 lbs. organic chicken breasts
1 yellow onion, peeled and chopped
2 jalapenos chilies, seeded and chopped
2 poblano chilies, seeded and chopped
2 Tbsp. coconut oil
1 14 oz. can fire roasted diced tomatoes
1 14 oz. can fire roasted crushed tomatoes
1 14 oz. can tomato sauce
5 cloves of garlic, minced
2 Tbsp. chili powder
1 Tbsp. cumin (or 2 drops Cumin essential oil)
2 tsp. dried oregano (or 1 drop Oregano essential oil)
Freshly ground pepper to taste (or 1 drop Black Pepper essential oil)
Salt to taste (optional)

1 14 oz. can dark red kidney beans
1 15 oz. can garbanzo beans
8 oz. vegetable broth (optional)

Garnish: Avocado, Cilantro, Limes (or 1 drop Lime essential oil)

Mix the vegetables (except the beans), oil, sauce, and spices in a large bowl until just combined. Place the chicken in the slow cooker, and pour the vegetable mixture on top.

Cook the stew in the slow cooker on low for eight hours, or on high for six hours. Add the kidney and garbanzo beans to the stew. If it is too thick for your liking, add the vegetable broth. Set the slow cooker for another hour on low, or 30 minutes on high.

When the slow cooker is finished, remove and shred the chicken in a bowl. Add it back to the stew and stir to combine.

Serve topped with chopped avocado and cilantro, and lime wedges.

Enjoy! 🙂

The 62 Degree Egg

That’s Celsius, not Fahrenheit. Popping up everywhere in chic restaurants. What is the fuss all about? Armed with my Sansaire and a dozen farm fresh eggs, I decided to find out for myself.

Sometimes called a sous vide egg, the real correlation is the immersion cooking. Eggs cooked with an immersion circulator don’t need to be vacuum sealed as in a sous vide preparation (sous vide translates loosely to vacuum sealed). Eggs are already sealed perfectly in their own shell. This is a method for cooking eggs at a consistently precise temperature.

I decided to start experimenting with my eggs and varying water temperatures. Does cooking time matter? Yes, it factors in with eggs and immersion cooking. You cannot leave the eggs in the water for hours without changes in the consistency. Conversely, you can cook them to the temperature you desire and refrigerate them for a day or two until you are ready to serve. For this round of testing, I let my eggs cook in their hot bath for one hour.

Experiment #1 – 62 deg. Celsius: Poached Eggs over Garlic Ciabatta

There is nothing better than a smooth, silky egg yolk opened over practically any food. Tonight it is garlic ciabatta toast – I cheated and used the New York kind I had in my freezer.

2 farm fresh eggs, room temperature
Garlic ciabatta toast, or any toast you prefer
Freshly ground salt and pepper

Set your Sansaire (or other immersion circulator) to 63 deg. Celsius, 143.6 deg. Fahrenheit; and take the eggs out to reach room temperature. It will take a bit to reach this water temperature depending on how much water you are using. At temp, slowly lower the eggs into the water using a ladle. Remember, they are fragile hitting water of this temperature. Set a timer for one hour on the eggs.

With about 10 minutes left on the timer, prep the toast. Keep it warm in the oven until ready to plate.

After an hour, remove the eggs from their hot bath. Crack the largest end of the egg on the counter, and start to gently peel it. Once you have the large end peeled, let your egg slowly slide out onto a large spoon or ladle. You will notice that the runny part of the white is not completely set; this can be discarded. The thicker part of the white will be just set.

These little guys are surprisingly resilient; but do be careful with them. The first one I peeled rolled right off the piece of toast and I was afraid it was going to break the yolk. I chased it around the bowl with my ladle and got it back onto the toast, unbroken. Sprinkle with freshly ground salt and pepper to taste; I used Savory Spices’ Cantanzaro Herbs Seasoning Salt.

wp_20160203_21_58_33_pro2028229

The consistency of the egg yolk? Creamy, dreamy, and utterly delicious. The bright orange, silky yolk was the perfect complement to the toast. Distinctly different than a standard poached egg; this method is definitely now my preferred method for poaching. Enjoy!

wp_20160203_21_59_08_pro2028229-x2

Sous Vide Steak Sunday

WOW! I can’t believe it’s been one year to the day since I’ve blogged here. Life. Tonight I decided I’d like a traditional steakhouse meal of Ribeye, mashed potatoes, and green beans (unfortunately I am out of asparagus). I picked up a really nice ribeye the other day, from Carolina Fish Market, who have recently started stocking Meats by Linz. The best way to cook a steak? Sous vide, of course. It gives you the perfect cook – every time – from edge to edge. Also, you can just drop it in it’s little bath and leave it alone for a while. You can learn more about sous vide cooking on the Sansaire site.

Let’s get started.

I like my steak rare, so I set my Sansaire to warm the water bath to 122 deg. F. (Depending on how you like your steak done, you can refer to the Sansaire guide for cooking steak.) While waiting for the water to heat up, I seasoned my steak. I’m a big fan of lots of freshly ground black pepper, as it makes a very nice crust when you sear it. I used ground black pepper, pink Himalayan salt, and a shot of Hudson Bay Beef Spice from Savory Spices – my favorite spice store.

wp_20160117_19_06_28_pro2028229-x2

After seasoning, it needs to go into a waterproof bag with the air removed. I used my Food Saver machine, but you can also use a Zip-lock bag if you don’t have a sealer. Before sealing, I added about two tablespoons of garlic-infused olive oil. Sealed it up and it was ready for the bath.

wp_20160117_19_12_53_pro2028229-x2

I dropped it into the 122 deg. F water and let it go for 90 minutes. Because the Sansaire keeps the water at the perfect temperature, you can leave it there for up to four hours without worrying about overcooking.

wp_20160117_19_34_22_pro2028229-xl

In preparation for it leaving the bath, heat a skillet on high. You can also create your sear on the grill, a cast iron skillet, or by using a searing torch. Your standard kitchen torch for creme brulee will not cut it here – you need one much stronger. I have yet to order one, so for me tonight it’s an All-Clad Copper Core pan.

I heated my pan on high, and when it was hot, added a tablespoon of butter. Keep that butter moving so it doesn’t brown. When the bubbles start to settle down, add the steak. I continuously keep mine moving in a circle around the pan, so it doesn’t burn and keeps moving the butter/juices around. After about a minute, check the sear and flip the steak if it suits you. Same thing on the other side, and then plate it. There is no need to rest a steak when cooked via sous vide.

wp_20160117_21_25_44_pro2028229-xl

Now I know you are all thinking, ‘Let’s see the inside! Show me that edge to edge perfectly cooked steak.’ Here you go, plated with mashed Yukon Gold potatoes and French green beans; freshly ground black pepper and a sprinkle of sea salt flakes. Happy sous viding! 🙂

wp_20160117_21_30_32_pro2028229-xl


Shakshuka and My First Experience with Cast Iron

I recently picked up a couple of pieces of cast iron cookware to try. I’ve been reading a lot about it, particularly in the Cast Iron Cookbook group on Facebook. I am a cast iron newbie, and have been reluctant to try it because I was under the impression that it couldn’t be used on glasstops. Wrong! It is in fact safe to use on glasstops; just no sliding across the top, and take care when you put it down on the top. The pans I picked up were pre-seasoned Lodge cast iron. Some people recommended seasoning them, some said it was okay to just wash with hot water and use them. With my first piece, I just washed the pan and got going.

My good friend posted a picture of Shakshuka that he had made for dinner and I got inspired. Shakshuka is a lovely dish of Tunisian origin, eggs cooked softly in a spicy tomato sauce. First introduced and popular in Israel, is a staple of Middle Eastern cuisines, and is traditionally served in a cast iron pan or tajine with bread to mop up the sauce. There are many different variations on Shakshuka, below is my version of this delicious dish (adapted from Tori Avey’s page). Next I believe I will tackle Yotam Ottolenghi’s and Sami Tamimi’s version in the stunning Jerusalem cookbook.

I use harissa-infused olive oil in this recipe, but plain olive oil works just as well. I also used fresh tomato sauce that my mom canned in the summer. Luckily I was the beneficiary of a good supply of pints of this summer deliciousness.

Oh, and as for the cast iron….I’m in LOVE!!! 🙂

073 (4)

2 tbsp harissa-infused olive oil
1/2 medium brown or white onion, peeled and diced
2 cloves garlic, minced
1 medium red bell pepper, chopped
1 14 oz. can fire-roasted diced tomatoes
1 14 oz. can tomato sauce
3 tbsp tomato paste
1 tsp medium chili powder
1 tsp cumin
1 tsp hot Spanish paprika
Pinch of cayenne pepper
Salt and pepper to taste
5-6 eggs
1/2 tbsp fresh chopped cilantro (optional)

Heat a deep, large skillet or sauté pan on medium. Slowly warm the olive oil in the pan. Add chopped onion and sauté for a few minutes until the onion begins to soften. Add the garlic and continue to sauté till mixture is fragrant.

Add the bell pepper, sauté for 5-7 minutes over medium until softened.

Add tomatoes, tomato sauce, and tomato paste to the pan, stir till blended. Add the spices, stir well, and allow mixture to simmer over medium heat for 5-7 minutes till it starts to reduce. Taste the mixture and spice it according to your preferences. Add salt and pepper to taste, a bit of sugar if you like a sweeter sauce, or more cayenne pepper for a spicier Shakshuka (be careful with the cayenne… it is extremely spicy!).

Crack the eggs, one at a time, directly over the tomato mixture, making sure to space them evenly over the sauce. I usually place 4-5 eggs around the outer edge and 1 in the center. The eggs will cook “over easy” style on top of the tomato sauce.

Cover the pan. Allow mixture to simmer for 10-15 minutes, or until the eggs are cooked and the sauce has slightly reduced. Keep an eye on the skillet to make sure that the sauce doesn’t reduce too much, which may lead to burning.

If you like your eggs runny with Shakshuka, let the sauce reduce for a few minutes before cracking the eggs on top. Then cover the pan and cook the eggs to taste.

Garnish with the chopped cilantro, if desired; and serve with a warm, crusty bread to mop up the sauce. Enjoy! 🙂

Sous Vide Lobster Tails

I have been wanting to try sous vide cooking for some time, and on the recommendation of my colleagues bought myself a Sansaire for Christmas. Being one of those people who has a lot of kitchen ‘gadgets’, and very susceptible to advertising of new ones, I wanted a sous vide unit that would be easy to store. The Sansaire is just perfect. It’s a tall, black tower that you immerse partially into water for sous vide cooking. It stores easily, and doesn’t take up the room that something with a water receptacle would. For those that are curious, you can cool down bottles of wine very quickly with this baby as well. 🙂

Clean Catch had a huge selection of seafood in for the holidays, and I picked up two 10 ounce lobster tails with the rest of my order. I did some research on sous vide and cooking lobster, and it went all the way from 17 minutes to 41 minutes at 140 deg. F. Most of the articles were close to the 40 minute mark. Armed with my new toy, off I went into the kitchen.

My lobster tails came out very tender, with the entire tail cooked the same. Cooking in the water bath preserves the true taste of the lobster, which other methods don’t always do. I would cook these over and over again, and I can’t wait to try a variety of things with the Sansaire.

The Tails

2 10 oz lobster tails
4 Tbsp high quality butter; I used Plugra European Style, Kerrygold Irish works as well
2 tsp of your favorite seafood seasoning; I used Savory Spice Shop’s Cherry Creek Seafood Seasoning
Quartered lemons, for serving

In a pot big enough to hold water to be between the minimum and maximum lines on the Sansaire, fill it appropriately, keeping in mind that you will be adding food to it. Immerse the Sansaire, and set it to 140 deg. F.

Remove the meat from the lobster tails. I’ve found the easiest way to do this is to cut down the middle of the front and the back of the tail with seafood shears, and then carefully work the meat away from the shell. You can also blanch them for a minute to make the meat easier to remove.

WP_20141224_20_14_10_Pro (3)

Put the tail meat, with 1 Tbsp of butter and 1 tsp of seafood seasoning, into a Food Saver bag. If you don’t have Food Saver bags, you can use a normal plastic zip and lock bag. Remove all the air from the bag and seal it using the machine. If using a normal plastic bag, lower the bag slowly into the water. The water will displace the air in the bag. When you are near the top, zip it closed.

WP_20141224_20_32_16_Pro (3)

When your bags are sealed, confirm the water temperature is at 140 deg. F., and drop them into their bath. Leave them alone for 41 minutes.

WP_20141224_21_02_08_Pro (3)

After the time has passed, remove them from the water and from their bags. Serve with lemon quarters and two Tbsp. drawn butter. Enjoy!!

WP_20141224_21_26_22_Pro (3)

Paprika-Spiced Pork and Sauerkraut Stew

As the trees start to turn in the Carolinas, and the air gets a bit crisp, it’s nice to spend a Sunday in relaxing and cooking for the afternoon. Tonight’s dinner – a richly-spiced, deeply savory, complex dish, arrived at through overnight marinating and slow cooking.

The pork in this dish is marinated at least overnight, I marinated for two nights. I adapted this from Food and Wine, with a couple of tweaks to make it a richer stew. I love sauerkraut, so doubled the amount; and also added less liquid than the original. I browned the meat in grapeseed oil instead of canola oil. Grapeseed oil has a higher heat tolerance than most oils, and I wanted a very good sear on the pork.

The prep is pretty easy for this one, and it makes you hungry while it cooks! I could almost taste it while it was softly simmering away through the afternoon, the fragrance from the paprika floating warmly through the house.

Enjoy! 🙂

WP_20141026_19_56_08_Pro (2)

6 garlic cloves, thinly sliced
4 red bell peppers, chopped
2 medium yellow onions, chopped
Kosher salt
2 pounds trimmed pork shoulder, cut into 1 1/2-inch cubes
2 tablespoons grapeseed oil
2 tablespoons tomato paste
1/2 cup Hungarian sweet paprika
2 teaspoons Hungarian hot paprika
2 pounds sauerkraut, drained
One 750-ml bottle red wine
1 quart low-sodium beef broth
1 teaspoon dried marjoram
2 bay leaves
2 Hungarian wax, banana or Cubanelle peppers, thinly sliced
1 teaspoon black pepper
Cooked wide egg noodles, for serving
Crème fraîche or sour cream, for serving

Puree half of the garlic, bell peppers and onions with 1 tablespoon of salt until smooth in a food processor. Pour the mixture into a large bowl, add the pork cubes and stir to coat. Cover with plastic wrap and marinate overnight in the refrigerator.

Drain the pork, wipe off any marinade and pat dry with paper towels; this is important to get a good sear. In a large Dutch oven, heat the grapeseed oil. Working in batches, add the pork to the pot and brown over moderate heat, turning once, about 4 minutes per batch. Do not crowd the pieces of pork, or they will steam instead of searing. Transfer the browned pork to a plate. Add the tomato paste to the pot and cook, stirring, until lightly caramelized, about 2 minutes. Add both of the paprikas and cook, stirring constantly, for 1 minute. Return the pork to the pot and add the sauerkraut, wine, broth, marjoram and bay leaves. Bring to a boil. Reduce the heat and simmer, uncovered, until the pork is nearly tender, about 1 1/2 hours.

Stir in the remaining garlic, bell peppers and onions. Add the Hungarian wax peppers and cook until the pork and vegetables are tender, about 30 minutes longer. Discard the bay leaves. Stir in the black pepper and season with salt. Serve in bowls over egg noodles with a dollop of crème fraîche.

MAKE AHEAD: The finished stew can be refrigerated for up to 3 days before serving.

Sunday Papers

All of my posts so far have been food-related, but today I am thinking about the Sunday paper.

A staple. When I was a child, every week my grandparents would pour through the Sunday paper. They read all the daily papers during the week, but the Sunday paper was a time of reflection and relaxation. I remember them sitting on the front porch with all windows open, reading the paper and trading stories. They both worked so hard during the week, and my Mom can attest to them working so much harder when she was a child. Sunday was the day for them to go to church and just relax. Chicken and dumplings may or may not have followed.

Out on the front porch, with the breeze from the St. Lawrence flowing in. I didn’t realize how good this was until I moved to land-locked Charlotte. 🙂 Don’t get me wrong – I love my city. More and more I miss those lazy summer days on the river. I miss the fresh air coming from that river, and I miss the absolute silence at night. Crickets…I hated you in New York, but I love you now. You sing a happy song that I miss so much. You are welcome in my house, please sing me a song.

It’s interesting how perspectives change and evolve. I value my life where I live, but just as much I miss where I grew up. I look forward to spending the month of September in a camp on Wilson Hill, with the St. Lawrence as my front yard. I hope my mom will bring me the Sunday paper and spend Sundays with me, relaxing with the river as my grandparents once did.

European Dover Sole Meuniѐre

The first and only time I had Dover Sole, it was, for lack of a better word, magnificent. Sautéed to a golden brown, served with a lush and decadent butter sauce, accented with capers and lemon. Definitely not an everyday meal, to be enjoyed for a special occasion.

The very best European Dover Sole comes from Holland, and is not often found in the US. It should not be confused with Pacific Dover sole, which is not a true sole and is related more closely to flounder. Clean Catch advertised they had fourteen of these special European fish fresh out of the water in Holland and on the way via overnight this week, with the description:

‘The flesh has an exceptional density, with tightly packed flakes that are amazingly juicy. Their aroma when cooked will remind you of savory bacon, and the flavor has a hazelnut sweetness you won’t find in any other fish. There is a buttery richness on the mouth, with an ocean flavor that dissipates slowly with each bite. Dover sole is an indulgence, an experience one you will not experience with any other fish.’

I decided to indulge.

Where to start. The most prominent chef to profess her love for this special fish was Julia Child. In My Life in France, she wrote that eating Sole Meuniѐre on her arrival in France was ‘an epiphany’. I pulled out my copy of Julia’s Mastering the Art of French Cooking, but much to my dismay Sole Meuniѐre was not included. A Bing search yielded her recipe from The Way to Cook; I tweaked it a bit to my liking. In this recipe, I use cilantro instead of parsley, sauté the fish in butter-infused olive oil, and add lemon and cilantro directly to the butter sauce.

1 European Dover Sole, filleted, skinned, with head removed
Salt and pepper
1/2 cup flour
2 Tablespoons organic butter-infused olive oil (or other high quality olive oil)
4 tablespoons of clarified butter
Fresh cilantro, chopped
2 Tablespoons capers
Juice of ½ lemon
Lemon wedges and cilantro

Layout and pat dry the fillets. Season with salt and pepper. Dredge in a light coating of flour, brushing off excess with your fingers.

Heat the clarified butter slowly on low-medium heat in a small saucepan.

Add the olive oil to a large skillet on medium-high heat. When the oil heats up, place filets in the pan, without overcrowding, about 3 to 4 to a skillet. Brown on one side about 1 to 2 minutes, and carefully flip over to brown the other side.

While the fish is finishing browning, add the capers and lemon to the butter. Be aware that these have a pretty violent reaction, and will spatter. Cover with foil if you like until the reaction stops. Add the chopped cilantro and stir gently.

Remove fish to a platter. Spoon the lemon-caper butter sauce over fish. Garnish with lemon wedges and cilantro. Serve immediately.

C’est magnifique! 🙂

WP_20140302_19_34_54_Pro (2)